When you record a Zoom meeting, you have two main options for where your recording can go: cloud storage or your local device. Cloud recordings are saved on Zoom’s cloud so you can access from anywhere and share across devices. Local recordings are saved directly to your computer, usually in a folder like "Documents" so you have more control over your files.
Both have their benefits depending on your needs. If you want more flexibility, Bluedot offers a great option for seamless recording that fits into your preferred storage method making it even easier to manage your meeting recordings and record meetings. If you’re wondering how to manage these recordings including finding local recordings, keep reading to learn more about both methods and how you can choose the best one for your Zoom meetings.
Where Do Zoom Meeting Recordings Go?
When you auto-record on Zoom, you have two main options for where your Zoom cloud recording can be saved: cloud storage or record locally on your local device. Here’s how each one works:
- Cloud Recordings: If you choose cloud recording, your meeting will be uploaded to Zoom’s cloud after the session ends. To access your Zoom cloud recordings, just log into your Zoom account, go to the "Recordings" tab, and you’ll find them there. You can access these recordings from any device anytime.
- Local Recordings: If you prefer keeping things stored on your own device local recordings will save directly to your computer after the meeting. These recordings are typically saved in your "Documents" folder but you can also find them by following the file path or simply searching for them.
Where Are Your Zoom Recordings Saved When Using Bluedot?
When you record a Zoom meeting using Bluedot, the location where your recordings are saved on the meeting host’s computer depends on your plan and preferences including if you have extra cloud storage .
- Free Plan: If you’re using the free version of Bluedot your Zoom meeting recordings are saved locally on your computer. These local Zoom recordings are typically stored in a folder like "Documents" under a subfolder called "Zoom." This option is great if you prefer keeping everything on your device without worrying about cloud storage.
- Paid Plans (Basic, Pro, Business): For users on Bluedot’s paid plans recordings are automatically uploaded to your Google Drive. This means your Zoom meeting recordings are saved in the cloud so you can access from anywhere. You can retrieve and share your recording files across devices making it ideal for teams or people who need to access recordings on the go.
Cloud Recordings: What Are They and How Do They Work
Recordings in the cloud are a feature offered by Zoom that allows you to store your recorded Zoom meetings online, on Zoom’s servers also known as the Zoom cloud. Once your meeting ends Zoom will automatically upload the recording to the cloud where it’s securely stored. You can easily access your active Zoom meeting after you recorded it helping you find recordings from anywhere with an internet connection making them highly convenient for remote teams and individuals on the go.
Zoom’s cloud storage has several benefits: first it frees up space on your local device as the recordings are stored online. This is great for users who have limited storage capacity on their computers and need account management . Secondly when you record Zoom meetings it’s easy to share. You can simply send a link to others without worrying about large file sizes or uploading to a separate service. For teams recordings also allow for easy collaboration since everyone can access the same file from multiple devices whenever needed.
Local Recordings: The Cloud Storage Alternative
Local Zoom recording are another option for saving your Zoom meetings where local Zoom recordings are saved locally directly on your computer instead of Zoom’s cloud. When you use the local recording feature Zoom will save the file to a designated folder on your device often within your “Documents” folder. This gives you full control over your recordings and they are available offline.
One reason users prefer local recordings is the ability to have full control over file storage. If you’re worried about cloud storage limits or privacy you can click recordings for finding recordings and saving locally which can be a more secure option. Additionally local recordings allow users to organize their files as they see fit without relying on cloud services. However local storage takes up space on your device so it’s important to regularly manage and back up files if you have many recordings.
Where do Zoom Recordings go on the Zoom Desktop App?
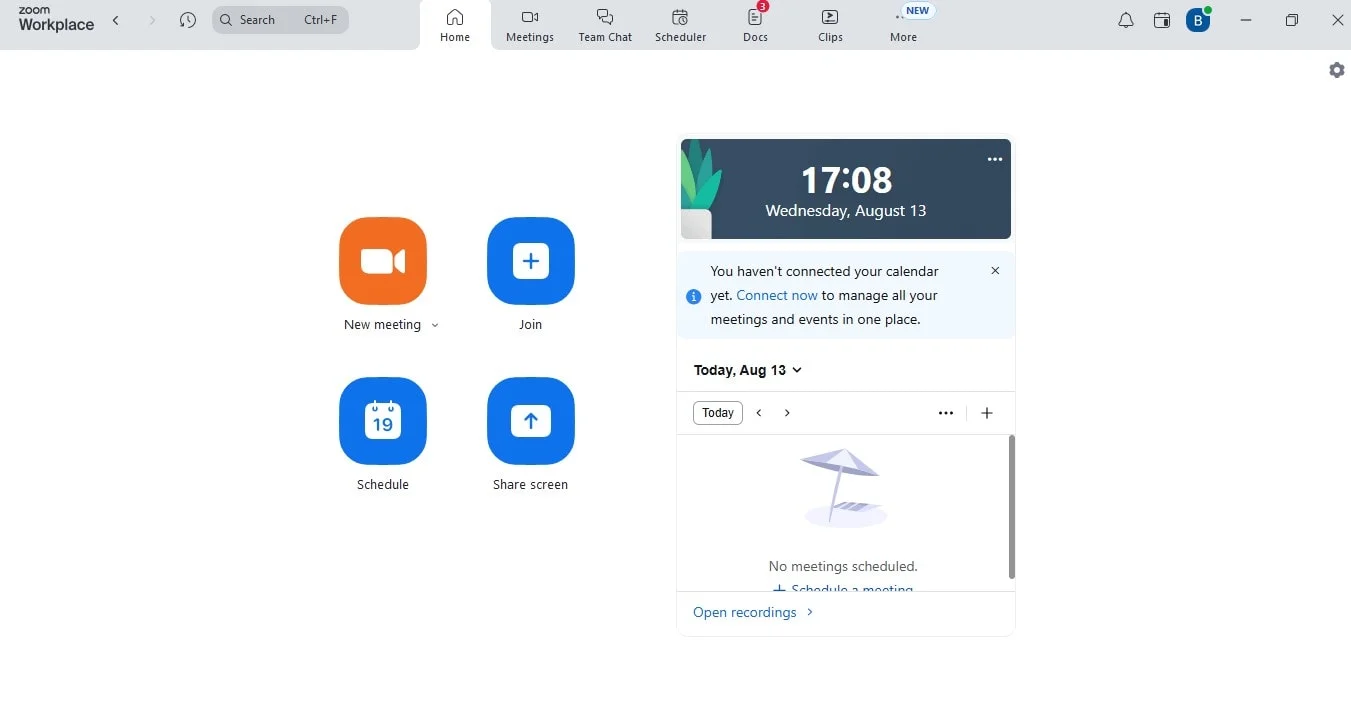
Accessing and managing your cloud and local recordings through the Zoom desktop app is easy. Here’s how you can do it:
- Open the Zoom Desktop App: Open the Zoom app on your computer and sign in to your account.
- Go to the Meetings Tab: Click on the “Meetings” tab at the top of the app.
- Find Your Recordings: On the left menu select “Recorded”. This will show you all your recorded meetings both in the cloud and locally.
- Access Your Recordings:
- Recordings in the cloud: These are stored online. Click “View” to open the recording in your browser.
- Local Recording: These are saved directly to your computer. Click “Open” to find the file on your device.
- Manage Your Recordings: From here, you can play, delete or share your recordings. For local files you can also organize them by moving them into folders on your computer.
Where do Zoom Recordings go on Mobile Devices?
You can also access your Zoom meetings recordings on your mobile device but there are some limitations when you try to automatically record meeting:
- Open the Zoom Mobile App: Launch the Zoom app on your phone (available for both iOS and Android) and sign in.
- Navigate to the Meetings Tab: Tap the “Meetings” tab at the bottom of the screen.
- Find Your Recordings: Select the “Recorded” section and you’ll see a list of your recordings.
- View or Share: Tap on a recording to view it. You can also share a direct link to the recording with others.
Limitations:
- No Local Recordings: Unfortunately local recordings are stored on your computer so you can’t access them from the mobile app.
- Limited Features: While the mobile app lets you view and share recordings it doesn’t have the same management options as the desktop app.
Where do Zoom recordings go with Bluedot?

Accessing your full recording of Zoom recordings stored with Bluedot is easy. Follow these simple steps:
1. Log Into Your Bluedot Account
Log into your Bluedot account via the Bluedot app or web portal. This will give you access to all your Zoom recordings.
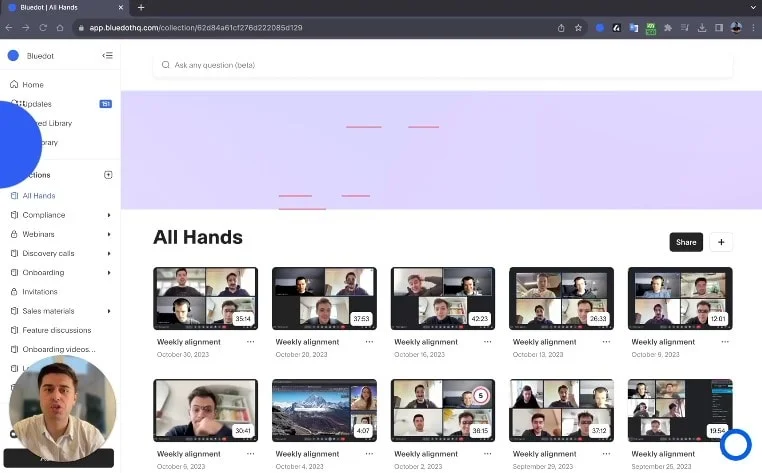
2. Go to the Recordings Section
After logging in, go to the “Recordings” section where all your Zoom meeting recordings are stored. This is where you’ll find both cloud and local recordings, depending on your settings.
3. Use the Search Feature
Use the search bar or filters to quickly find the Zoom recording you need. You can search by meeting date, meeting ID or other criteria to make it easier to find the specific recording.
4. View, Download or Share
Once you’ve found your Zoom recordings you can either click to view them, download the recording to your computer or share a direct link to the recording with others.
Conclusion
Organizing your Zoom recordings is very important and whether you prefer recordings for easy access from any device or local recordings for more control over your files, both options have their benefits. To keep everything in order with recording management, make sure to back up your recordings regularly and give them clear and organized names. Cloud recordings are great for easy sharing and collaboration while local ones can be stored and managed on your computer.
With Bluedot, managing your Zoom recordings is even easier. Whether you store them in the cloud or locally Bluedot helps you to record, store, and access your meetings, making it a popular Zoom alternative. You can even generate meeting notes with Bluedot. By understanding your options and staying organized Bluedot makes sure that ending your meetings are always easy, and quick to find and share when you need them most.
FAQs
How do I change my cloud storage settings for Zoom recordings?
Changing your cloud storage settings with your Zoom account is easy! Just log into your Zoom account, go to Settings and find the “Recording” section. From there you can choose record settings to decide whether to store your recordings in Zoom’s cloud or adjust your zoom recording settings to save them locally on your device. If you prefer cloud storage make sure the cloud recording option is enabled and check you have enough space for your recordings.
Can I access Zoom recordings without an internet connection?
If you have local recordings, yes. You can access them anytime even if you’re offline. However if your meeting is saved in the cloud (like Zoom’s cloud or Google Drive) you’ll need an internet connection to access it since these recordings are stored online.
Are Zoom recordings automatically deleted and how do I prevent that?
Yes, cloud recordings are automatically deleted after a certain period depending on your account type. Free accounts keep them for 30 days. If you want to keep them longer you can download the recordings or change your cloud recording settings if you’re on a paid Zoom account. Some paid accounts have extended storage so check your account settings for more options.
How do I download and share Zoom meeting recordings with others?
To download a Zoom recording from the cloud just log into your Zoom account, go to the “Recordings” tab and click on the meeting. From there you can either download the file or share a direct link with others. If it’s a local recording just navigate to the zoom folder where it’s saved and share it like any other file on your computer. That’s it!